> ## Documentation Index
> Fetch the complete documentation index at: https://docs.cloud.cdata.com/llms.txt
> Use this file to discover all available pages before exploring further.
# Quick Start
> Connect an AI agent to Connect AI via MCP and answer a question about real data, using either a public sample file or your own data source.
Connect an AI agent to your data through [Model Context Protocol (MCP)](/en/API/MCP) and answer a question
about that data. Expect to spend a few minutes in your terminal and a few in the Connect AI application.
In this guide, you will use a coding agent, such as Claude Code, to query your data via MCP. You will
also learn how to create a connection in the web interface or from the command line. To reach your data
from Power BI, Excel, or Tableau instead, see [Integrations](/en/Integrations).
Not ready to use your own data? Step 3 offers a public weather file that requires no credentials.
It exercises the same setup, so you can prove the connection works before involving real data. See
Step 3, **Use the Web Interface** tab for details.
## Step 1: Sign Up
Go to [Connect AI](https://cloud-login.cdata.com/u/signup) and create a free account. The [pricing page](https://www.cdata.com/ai/pricing/) lists what each plan includes.
If you already have an account, [log in](https://cloud.cdata.com/) instead.
## Step 2: Connect Your Agent
Connect AI exposes a single remote MCP server at *[https://mcp.cloud.cdata.com/mcp](https://mcp.cloud.cdata.com/mcp)*. Point your agent at
that URL and authorize it with OAuth in the browser. The agent can then discover and query every source
you connect.
Connecting the agent first means it is ready to use right after you add a data source, and it lets the
agent create the connection for you.
Connect AI publishes a connector in the Claude connector directory, so no configuration file is
required.
1. Log in to [Claude](https://claude.ai).
2. Click your user name in the bottom-left corner, select **Settings**, and then click **Connectors**.
3. Click **Browse connectors** and search for *CData Connect AI*.
4. Click **CData Connect AI**, click **Connect**, and grant access.
Run the following command in your terminal:
```bash wrap theme={null}
claude mcp add --transport http connectai https://mcp.cloud.cdata.com/mcp
```
Adding the server registers it but does not authenticate it. Complete the sign-in from inside a
session:
1. Type `claude` to start a session, and then run the `/mcp` command.
2. Select the `connectai` server, and then choose **Authenticate**. Claude Code opens your browser to
the Connect AI sign-in page.
3. Complete the sign-in. When you return to the terminal, the server status changes to connected.
For installation instructions, see the [Claude Code documentation](https://code.claude.com/docs/en/overview).
Connect AI publishes an app in the ChatGPT app directory, so no configuration file is required. This
path needs a ChatGPT Plus or Pro subscription.
1. Sign in to [ChatGPT](https://chatgpt.com).
2. Click **Apps** in the left panel.
3. Search for *CData Connect AI* and select it.
4. Click **Connect**, click **Sign in with CData Connect AI**, and complete the sign-in.
5. Click **Start chat**. If Connect AI is not already enabled, click **+**, select **More**, and then
select **CData Connect AI**.
The ChatGPT Apps feature is in beta and its setup steps change. For the current steps and screenshots,
see [ChatGPT](/en/Clients/ChatGPT-Client).
Copilot Studio reaches Connect AI as a tool on an agent that you create.
1. In the Copilot Studio navigation menu, click **Agents**, and then click **+ New agent**. Configure
the agent, and then click **Create**.
2. On the agent details page, click **Add tool**.
3. Search for *CData Connect AI* and click it.
4. Under **Connection**, click **Create new connection**, and then click **Create**.
5. Sign in to Connect AI, and then click **Add to agent**.
The tool appears under **Tools** on your agent. For the full walkthrough with screenshots, see
[Microsoft Copilot Studio](/en/Clients/MicrosoftCopilot-Client).
Create a `.gemini` folder in your user directory, and inside it create a file named `settings.json`
with the following configuration:
```json theme={null}
{
"mcpServers": {
"connectai": {
"httpUrl": "https://mcp.cloud.cdata.com/mcp/",
"trust": true
}
},
"selectedAuthType": "oauth-personal"
}
```
Type `gemini` in your terminal, and then run `/mcp auth connectai`. Gemini opens your browser to the
Connect AI sign-in page.
Gemini requires Python 3.10 or later. To connect through the Google Agent Development Kit instead, see
[Gemini](/en/Clients/Gemini-Client).
**One-click install:** [Add Connect AI to Cursor](cursor://anysphere.cursor-deeplink/mcp/install?name=connectai\&config=eyJ1cmwiOiJodHRwczovL21jcC5jbG91ZC5jZGF0YS5jb20vbWNwIn0%3D). Cursor opens and prompts you
to confirm.
To configure it manually instead, open **Cursor Settings**, click **Tools & MCP**, and then click
**New MCP Server**. The file `mcp.json` opens automatically. Add the following configuration:
```json theme={null}
{
"mcpServers": {
"connectai": {
"url": "https://mcp.cloud.cdata.com/mcp"
}
}
}
```
Return to **Tools & MCP**. Cursor detects that the server requires OAuth and opens your browser to the
Connect AI sign-in page. After you sign in, **connectai** appears with a green indicator.
**One-click install:** [Add Connect AI to Visual Studio Code](https://vscode.dev/redirect/mcp/install?name=connectai\&config=%7B%22type%22%3A%22http%22%2C%22url%22%3A%22https%3A%2F%2Fmcp.cloud.cdata.com%2Fmcp%22%7D).
To configure it manually instead, create a folder named `.vscode` in your project. Inside it, create a
file named `mcp.json` with the following configuration:
```json theme={null}
{
"servers": {
"connectai": {
"type": "http",
"url": "https://mcp.cloud.cdata.com/mcp"
}
},
"inputs": []
}
```
Click **Start** in your IDE to start the MCP server. Visual Studio Code opens your browser to the
Connect AI sign-in page. After authorization, the server displays **Running**.
The community `add-mcp` tool registers a remote MCP server across most coding agents, including Claude
Desktop, Codex, Gemini CLI, Goose, OpenCode, and Zed. Run `npx add-mcp list-agents` for the current list:
```bash wrap theme={null}
npx add-mcp https://mcp.cloud.cdata.com/mcp
```
For setup instructions for other clients, including GitHub Copilot, Gemini Enterprise, Windsurf, and
n8n, see [AI Tools](/en/Clients/AITools).
This guide uses OAuth, which requires no token management. To use Basic authentication with a
personal access token instead, see [Authentication](/en/API/Authentication).
## Step 3: Add a Data Source
Your agent is connected but has nothing to read yet. Choose how you want to create the connection. The
web interface handles any source, including the sample weather file. The other two paths drive the
[Management MCP](/en/API/MCP-Management) server, which configures OAuth sources such as Google Sheets
and Salesforce. Whichever you choose, the rest of this guide is identical afterward.
The Management MCP server creates and tests connections programmatically, so the agent you connected in
Step 2 can set the source up for you. Register a second server alongside the first, at
*[https://mcp.cloud.cdata.com/mcp/mgmt](https://mcp.cloud.cdata.com/mcp/mgmt)*, using whichever method you used in Step 2, and authorize it the
same way. In Claude Code that is:
```bash wrap theme={null}
claude mcp add --transport http connectai-mgmt https://mcp.cloud.cdata.com/mcp/mgmt
```
Now describe the source you want instead of configuring it through the user interface. Pick one of the
two below.
**Google Sheets, your own data, one Google sign-in:**
```text wrap theme={null}
Using the connectai-mgmt MCP server, create a Google Sheets connection named GoogleSheets that authenticates with OAuth.
```
**Salesforce, your own data.** A Salesforce administrator must
[install the CData connector](/en/Data-Sources/Salesforce) once before the first connection works:
```text wrap theme={null}
Using the connectai-mgmt MCP server, create a Salesforce connection named Salesforce that authenticates with OAuth.
```
The agent calls `list_available_sources` to confirm the source, `get_source_properties` to discover the
required fields, and `create_connection` to save it. Keep the connection names above, because the rest
of this guide refers to them.
Both sources use OAuth, so the agent returns a sign-in URL rather than a finished connection. Open it in
a browser and grant access, then ask the agent to confirm the result:
```text wrap theme={null}
Using the connectai-mgmt MCP server, test that connection and list the tables it exposes.
```
Every plan includes the Management MCP server. For the full tool list, see [Management MCP](/en/API/MCP-Management).
Pick one of the three sources below and follow its steps.
Open **Sources** > **+ Add Connection**, type *CSV* in the search field, and then click **CSV**.
Enter *SampleData* as the connection name. The rest of this guide refers to the connection by this
name, so use it exactly.
Enter the following **URI**:
```text wrap theme={null}
https://cdn.jsdelivr.net/npm/vega-datasets@2.11.0/data/seattle-weather.csv
```
In the **Authentication** section, select *HTTPS* from the **Connection Type** list. **Auth Scheme**
then defaults to *None*, which is correct: the file is public, so no credentials are required.
This page has two fields named **Connection Type**. The one to change is in the **Authentication**
section, below the **URI** box. Leave the **Connection Type** selector above it set to **Direct**.
Leave **FMT** set to *CsvDelimited* and **Include Column Headers** turned on. Both are the defaults.
Click **Save and Test**. A **Connection successfully saved** message confirms that Connect AI reached
the file.
The connection holds 1,461 daily weather records.
Open **Sources** > **+ Add Connection**, type *Google Sheets* in the search field, and then click
**Google Sheets**.
Enter a connection name or keep the default name.
Select **OAuth** as the authentication method.
(Optional) To improve performance, enter a comma-separated list of sheet names or IDs in the
**Spreadsheet** field, or enter a **Folder Name**.
Click **Sign in with Google**, and then log in and grant the requested permissions.
Click **Save and Test**.
Your spreadsheets are now queryable, with each sheet exposed as a table.
A Salesforce administrator must [install the CData connector](/en/Data-Sources/Salesforce) once before
the first connection on your account works.
Open **Sources** > **+ Add Connection**, type *Salesforce* in the search field, and then click
**Salesforce**.
Enter a connection name or keep the default name.
Select **OAuth** as the authentication method.
Set **Use Sandbox** to **True** if you are connecting to a sandbox account. Otherwise, leave it as
**False**.
Click **Sign in**, and then log in to Salesforce and grant the requested permissions. Connect AI uses
its own registered application, so no client ID or client secret is required.
Click **Save and Test**.
You can now query **Account**, **Opportunity**, **Contact**, and other objects in real time.
The [Management MCP](/en/API/MCP-Management) server is an HTTP endpoint, so `curl` and a personal access
token do the same work
with no agent. Take this path to drive the setup from a script or a runbook.
**Create a personal access token.** Go to the [Personal Access Tokens](/en/Settings/Personal-Access-Tokens) page and
create one. Basic authentication takes your email address as the user name and the token as the
password. See [Authentication](/en/API/Authentication).
**Confirm the server answers.** Run this before sending anything that matters:
```bash wrap theme={null}
curl -X POST https://mcp.cloud.cdata.com/mcp/mgmt \
-u ":" \
-H "Content-Type: application/json" \
-H "Accept: application/json, text/event-stream" \
-d '{"jsonrpc":"2.0","id":1,"method":"tools/list"}'
```
The response lists the management tools, including `create_connection` and `test_connection`.
**Check which sources this endpoint can configure.** `create_connection` handles 21 OAuth sources, not
every source Connect AI supports:
```bash wrap theme={null}
curl -X POST https://mcp.cloud.cdata.com/mcp/mgmt \
-u ":" \
-H "Content-Type: application/json" \
-H "Accept: application/json, text/event-stream" \
-d '{"jsonrpc":"2.0","id":2,"method":"tools/call","params":{"name":"list_available_sources","arguments":{}}}'
```
Each entry carries an `mcpCreatable` flag. Sources that take a file location rather than a sign-in, such
as the sample weather file, report `false`; create those on the **Use the Web Interface** tab.
**Create the connection.** Ask `get_source_properties` which fields the source expects, and then pass
them in `properties`:
```bash wrap theme={null}
curl -X POST https://mcp.cloud.cdata.com/mcp/mgmt \
-u ":" \
-H "Content-Type: application/json" \
-H "Accept: application/json, text/event-stream" \
-d '{"jsonrpc":"2.0","id":3,"method":"tools/call","params":{"name":"create_connection","arguments":{"name":"GoogleSheets","source":"GoogleSheets","properties":{"AuthScheme":"OAuth"}}}}'
```
The response includes the new connection's `id` and a sign-in URL. Open the URL in a browser and grant
access — OAuth requires this authorization step for every source this endpoint creates.
**Test it.** Substitute the `id` from the previous response:
```bash wrap theme={null}
curl -X POST https://mcp.cloud.cdata.com/mcp/mgmt \
-u ":" \
-H "Content-Type: application/json" \
-H "Accept: application/json, text/event-stream" \
-d '{"jsonrpc":"2.0","id":4,"method":"tools/call","params":{"name":"test_connection","arguments":{"id":""}}}'
```
To connect Google Sheets or Salesforce this way instead, call `get_source_properties` first to get the
field names that source expects, and then pass them in `properties`. Both use OAuth, so the
`create_connection` response returns a sign-in URL to open in a browser rather than a finished
connection.
You now have a queryable data source. Whichever path you chose, your agent from Step 2 can already
reach it.
These three are examples. The same steps work for every supported source, and each source has its own
page with the exact fields it needs, the prerequisites, and any additional authentication methods it
supports. Find your data source under the **Data Sources** heading in the table of contents. Sources
marked **Premium** in the **Add Connection** list, such as Snowflake and Google BigQuery, require a
Growth plan or higher.
## Step 4: Ask a Question
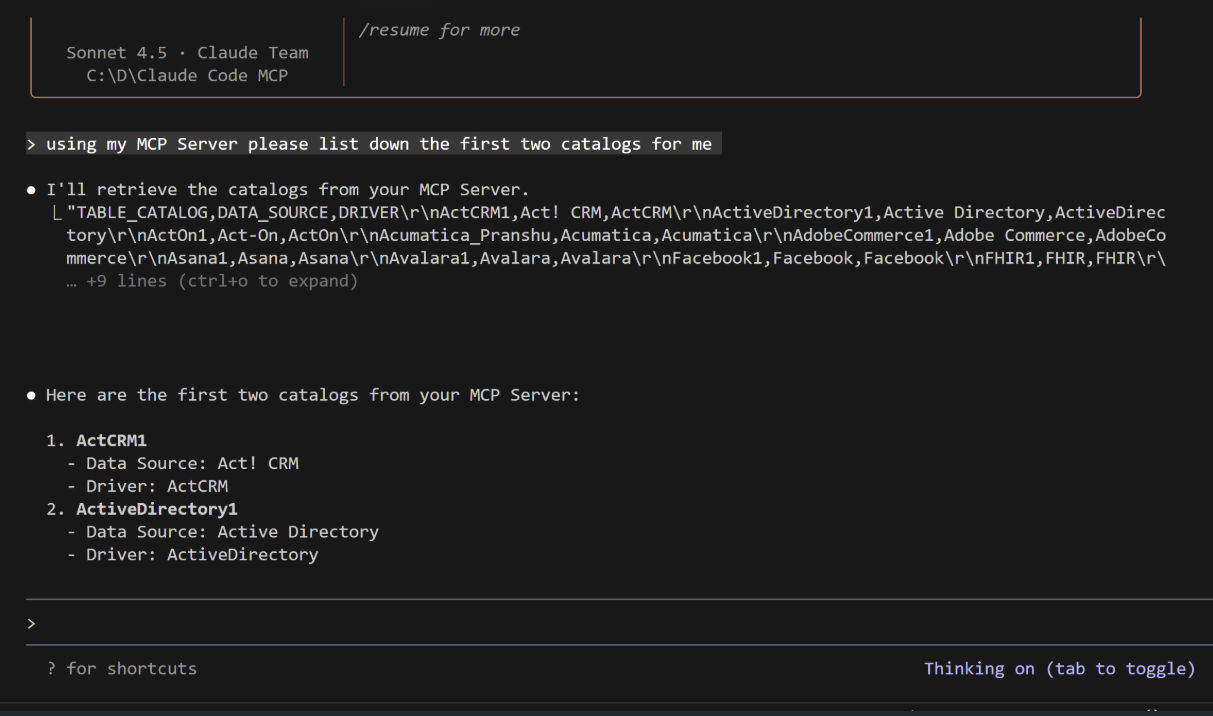
First, confirm that your agent reaches Connect AI at all:
```text wrap theme={null}
Using the connectai MCP server, list the data sources you can see.
```
The agent calls `getCatalogs` and returns the connection you just made. That confirms both the client
setup from Step 2 and the connection from Step 3.
Now ask a real question. Name the server in your prompt so that you can confirm the answer came from
Connect AI rather than from the model's own knowledge. If you connected the sample weather file:
```text wrap theme={null}
Using the connectai MCP server, query the SampleData connection and tell me how many days of each weather type there are, along with the average high temperature for each.
```
The agent discovers the connection and the table on its own, then writes and runs the SQL. You do not
write the query yourself. Expect five weather types, with rain and sun close to 640 days each. That is
how you know the answer came from your data rather than from the model.
The same pattern applies to your own sources. Substitute your connection, schema, and table names:
```text wrap theme={null}
Using the connectai MCP server, show me the largest open Salesforce opportunities closing in the next 90 days.
```
**You made your first MCP query.** Your agent discovered the data model and queried live data
through Connect AI, without any source-specific code.
If you used the sample file, this is the moment to connect something real. Your agent is already
authorized, so nothing in Step 2 changes. Only Step 3 repeats, and you can ask the same agent about the new
source in the same session. See the documentation for your data source for the fields it needs.
## Troubleshooting
Check the connection one layer at a time. The first check that fails tells you where the problem is.
**Confirm the client registered the server.** For Claude Code, run `claude mcp list`:
| Status | What it means | What to do |
| :- | :- | :- |
| Connected | The server is registered and reachable. | Nothing. |
| Needs authentication | The server is registered but not authorized. | Run `/mcp` in a session and choose **Authenticate**. |
| Failed to connect | The client cannot reach the server. | Confirm the URL and check your network. |
**Confirm the data source works.** Open **Data Explorer** and select your connection. If it returns rows
but your agent does not, the problem is in the client configuration rather than in the connection. If no
tables appear, click **Refresh Metadata** on the **Edit Connection** page.
**See exactly what your agent ran.** Open **Logs** > **Query Log**. Every query your agent sent appears
with a timestamp, the user, a status, and the full query text. Click a row to expand it. This is the
authoritative record of what the agent did, and it is the fastest way to tell a malformed query apart
from a permissions problem. See [Logs](/en/Logs).
**Confirm the server responds, independently of any client.** This separates a Connect AI problem from a
client problem, and it works before any client is configured. Create a personal access token on
the [Personal Access Tokens](/en/Settings/Personal-Access-Tokens) page, then run:
```bash wrap theme={null}
curl -X POST https://mcp.cloud.cdata.com/mcp \
-u ":" \
-H "Content-Type: application/json" \
-H "Accept: application/json, text/event-stream" \
-d '{"jsonrpc":"2.0","method":"tools/list","id":1}'
```
A working server returns a list of the tools it offers, including `getCatalogs`, `getTables`, and
`queryData`. For the complete list, see [MCP](/en/API/MCP#mcp-tools).
Other common causes:
* **Told that you are not allowed to perform the requested action?** Creating a connection needs the
Administrator or Connection Administrator role. Ask an Administrator to grant it or to make the
connection for you. See [Permissions](/en/Permissions).
* **Authentication errors?** Reauthorize OAuth and confirm scopes.
* **Slow queries?** Filter early and limit columns.
* **Agent cannot find your data?** Confirm it uses fully qualified table names in the form
*\[Catalog].\[Schema].\[Table]*.
## Ask More of Your Data
The same connection answers new questions with no further setup, and the agent writes fresh SQL each time:
```text wrap theme={null}
Using the connectai MCP server, which month in SampleData has the most rainy days?
```
The pattern holds for every source you connect. Add Salesforce, Google Sheets, or Jira and the same agent
queries it through the same server without being reconfigured. See [Sources](/en/Sources).
One endpoint exposes every source on your account, so this gets more useful as you add sources. An agent
discovers them all through `getCatalogs`, which means one conversation can reach Salesforce, HubSpot, and
Jira together without any per-source setup:
```text wrap theme={null}
Using the connectai MCP server, list my top 10 open Salesforce opportunities by amount, then check HubSpot for the most recent marketing activity on each of those accounts.
```
 The agent runs one query per source and correlates the results. Because both sources are reached
through the same endpoint with the same permissions, no per-source credentials or connector code are
involved.
## Use the Connection From Other Tools
One connection serves every consumer, with the same permissions applied to each. The same data is
available via MCP, [REST](/en/API/REST-API), [OData](/en/API/OData-Dashboard), and the
[Virtual SQL Server](/en/SQL-Server) endpoint at once, with no source-specific code between them. REST and
OData authenticate with a [personal access token](/en/Settings/Personal-Access-Tokens), and OData also
needs a [workspace](/en/Workspaces). See [API](/en/API/API) for the complete API reference.
BI tools read the connection you made in Step 3 through those endpoints, so there is nothing new to set up
on the Connect AI side. Start with
[Power BI Desktop](/en/Clients/PowerBIDesktop-Client), [Excel](/en/Clients/Excel365-Client), or
[Tableau Desktop](/en/Clients/TableauDesktop-Client), or see [Integrations](/en/Integrations) for the
rest.
## Next Steps
Your data is connected and queryable from agents, APIs, and BI tools. These are what people usually
reach for next.
### Get More Out of the Connection
* [Add another data source](/en/Sources)—Agents and BI tools pick up new connections without being
reconfigured, and you can then query across sources.
* [Explore and model in the browser](/en/Data-Explorer)—Data Explorer runs SQL against a connection
directly, which is the fastest way to see what a source exposes or confirm an answer the agent gave you.
Save a query as a [derived view](/en/Data-Explorer#configure-derived-views) and agents read it like a
table.
* [See what ran](/en/Logs)—The Query Log records every query with its full text, which is the fastest way
to trace an unexpected result or an unexpected bill from a source API.
* [Make the connection read-only](/en/API/MCP)—Add `?ops=` to the server URL so an agent can query your
data but cannot change it.
* [Ask questions without an agent](/en/Playground)—Playground answers natural-language questions about
your connected data from inside Connect AI, with no client to configure.
* [Reach data behind your firewall](/en/Connect-Gateway)—Connect Gateway is a reverse tunnel you run as a
Docker container or on Kubernetes, so Connect AI can query data in a private network or VPC without
exposing it to the internet.
### Control Access
* [Permissions](/en/Permissions)—Grant SELECT, INSERT, and EXECUTE access by need-to-know at the source or
workspace level, and choose whether each source uses a shared service account or per-user
authentication, so an agent sees only what the person driving it is allowed to see.
* [Workspaces](/en/Workspaces)—Group sources and derived views, and share them with teams.
* [Data Security](/en/Data-Security)—Data masking rules tagged to regulations such as HIPAA, PCI DSS, and
CCPA, plus rate limits, IP allowlists, and audit logging.
* [Security and compliance](/en/Security)—How Connect AI handles PII, and the frameworks it maintains,
including SOC 2 Type II, ISO, and GDPR.
* [Toolkits](/en/Toolkits)—Expose only the tables and operations an agent needs. Check the prerequisites
on that page first: Toolkits have both a plan and a role requirement.
## Get Help
* [Status page](https://status.cdata.com/)—current status and incident history for the application services.
* [CData Technical Support](https://www.cdata.com/support/submit.aspx)—also reachable from the **Support** link at the bottom of the dashboard.
* [Release Notes](/en/ReleaseNotes)—new connectors, enhancements, and fixes.
This documentation is built and hosted on [Mintlify](https://mintlify.com), a developer documentation platform.
The agent runs one query per source and correlates the results. Because both sources are reached
through the same endpoint with the same permissions, no per-source credentials or connector code are
involved.
## Use the Connection From Other Tools
One connection serves every consumer, with the same permissions applied to each. The same data is
available via MCP, [REST](/en/API/REST-API), [OData](/en/API/OData-Dashboard), and the
[Virtual SQL Server](/en/SQL-Server) endpoint at once, with no source-specific code between them. REST and
OData authenticate with a [personal access token](/en/Settings/Personal-Access-Tokens), and OData also
needs a [workspace](/en/Workspaces). See [API](/en/API/API) for the complete API reference.
BI tools read the connection you made in Step 3 through those endpoints, so there is nothing new to set up
on the Connect AI side. Start with
[Power BI Desktop](/en/Clients/PowerBIDesktop-Client), [Excel](/en/Clients/Excel365-Client), or
[Tableau Desktop](/en/Clients/TableauDesktop-Client), or see [Integrations](/en/Integrations) for the
rest.
## Next Steps
Your data is connected and queryable from agents, APIs, and BI tools. These are what people usually
reach for next.
### Get More Out of the Connection
* [Add another data source](/en/Sources)—Agents and BI tools pick up new connections without being
reconfigured, and you can then query across sources.
* [Explore and model in the browser](/en/Data-Explorer)—Data Explorer runs SQL against a connection
directly, which is the fastest way to see what a source exposes or confirm an answer the agent gave you.
Save a query as a [derived view](/en/Data-Explorer#configure-derived-views) and agents read it like a
table.
* [See what ran](/en/Logs)—The Query Log records every query with its full text, which is the fastest way
to trace an unexpected result or an unexpected bill from a source API.
* [Make the connection read-only](/en/API/MCP)—Add `?ops=` to the server URL so an agent can query your
data but cannot change it.
* [Ask questions without an agent](/en/Playground)—Playground answers natural-language questions about
your connected data from inside Connect AI, with no client to configure.
* [Reach data behind your firewall](/en/Connect-Gateway)—Connect Gateway is a reverse tunnel you run as a
Docker container or on Kubernetes, so Connect AI can query data in a private network or VPC without
exposing it to the internet.
### Control Access
* [Permissions](/en/Permissions)—Grant SELECT, INSERT, and EXECUTE access by need-to-know at the source or
workspace level, and choose whether each source uses a shared service account or per-user
authentication, so an agent sees only what the person driving it is allowed to see.
* [Workspaces](/en/Workspaces)—Group sources and derived views, and share them with teams.
* [Data Security](/en/Data-Security)—Data masking rules tagged to regulations such as HIPAA, PCI DSS, and
CCPA, plus rate limits, IP allowlists, and audit logging.
* [Security and compliance](/en/Security)—How Connect AI handles PII, and the frameworks it maintains,
including SOC 2 Type II, ISO, and GDPR.
* [Toolkits](/en/Toolkits)—Expose only the tables and operations an agent needs. Check the prerequisites
on that page first: Toolkits have both a plan and a role requirement.
## Get Help
* [Status page](https://status.cdata.com/)—current status and incident history for the application services.
* [CData Technical Support](https://www.cdata.com/support/submit.aspx)—also reachable from the **Support** link at the bottom of the dashboard.
* [Release Notes](/en/ReleaseNotes)—new connectors, enhancements, and fixes.
This documentation is built and hosted on [Mintlify](https://mintlify.com), a developer documentation platform.