> ## Documentation Index
> Fetch the complete documentation index at: https://docs.cloud.cdata.com/llms.txt
> Use this file to discover all available pages before exploring further.
# SCIM Groups
> Use SCIM to standardize the process of provisioning groups of users to Connect AI, assigning roles, and removing groups from Connect AI.
SCIM group provisioning lets you manage Connect AI access by syncing groups from your identity provider (IdP). Groups synced from your IdP are read-only in Connect AI. Create, update, and delete groups in your IdP, and SCIM keeps Connect AI in sync.
## Prerequisites
* **SSO** must be configured on your Connect AI account.
* **SCIM Groups** must be enabled on your account. Contact [CData Support](https://www.cdata.com/support/submit.aspx) to enable SSO and SCIM groups.
* **Microsoft Entra ID license requirement** *(Entra ID only)*: Automated SCIM provisioning requires Microsoft Entra ID Premium P1 or P2 (included with Microsoft 365 E3/E5). Organizations on the Entra ID free tier cannot configure automated provisioning.
Connect AI supports SCIM group provisioning with the following identity providers:
* Microsoft Entra ID
* Okta Workforce Identity Cloud
* Custom IdP (configured via SAML or OpenID Connect)
The following SCIM providers are NOT supported:
* PingFederate
* Google Workspace
* Active Directory Federation Services (ADFS)
* Active Directory/LDAP
## Configure SCIM Group Provisioning in Your Identity Provider
The steps below walk through the full SCIM groups configuration for Microsoft Entra ID and Okta Workforce Identity Cloud.
Connect AI does not appear in the Entra application gallery. You must create a new application from the gallery.
From the [Microsoft Entra admin center](https://entra.microsoft.com), navigate to **Enterprise apps** > **+ New application**. Click **Create your own application**, enter a name for the application (for example, *Connect AI SCIM*), select **Integrate any other application you don't find in the gallery (Non-gallery)**, and click **Create**.
In the navigation menu, under **Manage**, select **Properties**. Set **Assignment required** to **Yes** and click **Save**.
In the navigation menu, under **Manage**, select **Users and groups**. Assign the users and groups you want to provision to Connect AI. When you assign a group, the users from that group are provisioned automatically.
In the navigation menu, under **Manage**, select **Provisioning** and click **Get started**.
Set **Provisioning Mode** to **Automatic**.
Under **Manage**, select **Connectivity** and configure the following parameters:
* **Tenant URL**—enter the SCIM endpoint URL provided by CData Support and append `?aadOptscim062020` to the end of the URL. This is Microsoft's recommended workaround for a known SCIM 2.0 issue.
* **Secret Token**—enter the Bearer token provided by CData Support.
Click **Test Connection**.
Under **Manage**, select **Provisioning**, expand **Mappings**, and confirm that **Provision Entra ID Groups** is set to **Enabled**.
Under **Manage**, select **Attribute Mapping**, then select the **Users** tab. In the row containing `mail` and `emails[type eq "work"].value`, click the Edit icon and configure the following:
* Set **Match objects using this attribute** to **Yes**.
* Set **Matching precedence** to **2**.
Click **Apply** to save, then click **Save** on the Attribute Mapping page.
If users in your organization do not have the `mail` attribute populated in Entra ID, edit the same row and change **Source attribute** to `userPrincipalName` to ensure the email field is always populated during provisioning.
On the main Enterprise application page, select **Provision on demand**. Search for and select a user or group you assigned, then click **Provision**. Verify that the user or group appears in Connect AI.
Under **Provisioning**, set **Provisioning Status** to **On** to begin provisioning all assigned users and groups. After groups appear in Connect AI, assign roles to the group. See [Access Role Assignments](#access-role-assignments).
In the Okta Admin Console, navigate to **Applications** > **Browse App Catalog**. Search for **(OAuth Bearer Token) Governance with SCIM 2.0** and click **Add Integration**. Set an **Application label**, uncheck **Display application icon to users**, uncheck **Browser plugin auto-submit**, then click **Next** and **Done**.
From the application settings page, click the **Provisioning** tab and click **Configure API Integration**. Select **Enable API Integration**. Enter the following values provided by CData Support:
* **SCIM 2.0 Base URL**—the SCIM endpoint URL (remove any trailing slash)
* **OAuth Bearer Token**—the Bearer token
Optionally click **Test API Credentials** to verify the connection, then click **Save**.
Next to **Provisioning to App**, click **Edit**. Enable the following features:
* **Create Users**
* **Update User Attributes**
* **Deactivate Users**
Uncheck **Set password when creating new users**, then click **Save**.
Under **Attribute Mappings**, use the **X** button to delete the following rows, which can cause issues during updates:
* **Primary email type**
* **Primary phone type**
* **Address type**
Select the **Assignments** tab. Click **Assign**, choose **Assign to Groups**, select the groups to provision to Connect AI, and click **Done**.
You must assign the same groups to both the SCIM application and your SSO application in Okta.
Select the **Push Groups** tab. Click **Push Groups** and select **Find groups by name** or **Find groups by rule**. Search for and select the groups to provision, then click **Save**. Okta pushes the group objects to Connect AI.
After groups appear in Connect AI, assign roles to the group. See [Access Role Assignments](#access-role-assignments).
## SCIM Groups User Provisioning and Deprovisioning
When a user is added to a synced group in your IdP, Connect AI automatically provisions them. There is no need for the user to verify via email. The new user inherits the access roles assigned to that group. See [Access Role Assignments](#access-role-assignments) for details on assigning access roles to groups. The new user is also assigned to the system role Query user. You change the system role later by editing the user in the **Users** tab.
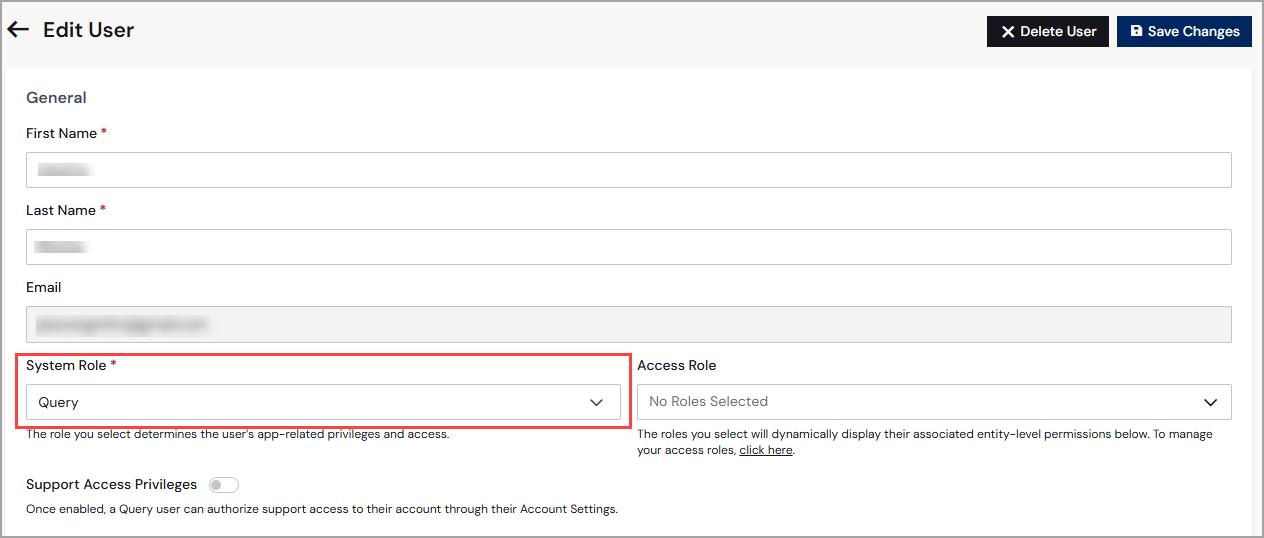 When a user is removed from a synced group, they lose the access roles assigned to that group. If the user is a member of multiple synced groups, they retain access through their remaining group memberships. To fully deprovision a user, remove them from all synced groups in your IdP and then call `DELETE /users/{id}` from the Management API to revoke PATs and any direct role and permission grants. The user record is retained but the user can no longer sign in.
## Access Role Assignments
After groups are synced, you assign Connect AI access roles to groups in the **Groups** tab of the **Users** page:
When a user is removed from a synced group, they lose the access roles assigned to that group. If the user is a member of multiple synced groups, they retain access through their remaining group memberships. To fully deprovision a user, remove them from all synced groups in your IdP and then call `DELETE /users/{id}` from the Management API to revoke PATs and any direct role and permission grants. The user record is retained but the user can no longer sign in.
## Access Role Assignments
After groups are synced, you assign Connect AI access roles to groups in the **Groups** tab of the **Users** page:
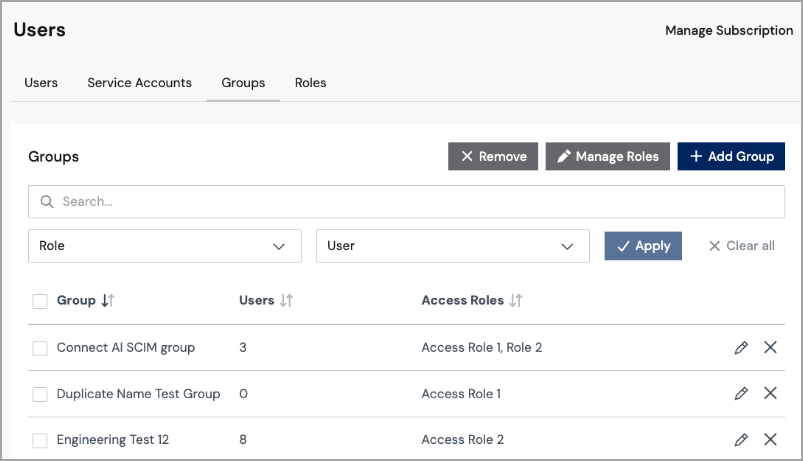 All current and future members of the group automatically receive the assigned roles. A group can hold multiple roles, and the same role can be assigned to multiple groups.
When you remove a role assignment from a group, members who held that role solely through this group assignment immediately lose it. See [Roles](/en/Roles) for details on system and access roles.
The Connect AI [Audit Log](/en/Logs#audit-log) displays SCIM group provisioning, membership changes, and role assignment changes.
## Frequently Asked Questions
**Why is the Get Started button unavailable in the Entra Provisioning tab?**
The **Get Started** button is unavailable when you are viewing an SSO enterprise app that does not have a native Entra provisioning connector. This is expected for Connect AI. You must create a new application from the gallery. See [Configure SCIM Group Provisioning in Your Identity Provider](#configure-scim-group-provisioning-in-your-identity-provider) above.
This documentation is built and hosted on [Mintlify](https://mintlify.com), a developer documentation platform.
All current and future members of the group automatically receive the assigned roles. A group can hold multiple roles, and the same role can be assigned to multiple groups.
When you remove a role assignment from a group, members who held that role solely through this group assignment immediately lose it. See [Roles](/en/Roles) for details on system and access roles.
The Connect AI [Audit Log](/en/Logs#audit-log) displays SCIM group provisioning, membership changes, and role assignment changes.
## Frequently Asked Questions
**Why is the Get Started button unavailable in the Entra Provisioning tab?**
The **Get Started** button is unavailable when you are viewing an SSO enterprise app that does not have a native Entra provisioning connector. This is expected for Connect AI. You must create a new application from the gallery. See [Configure SCIM Group Provisioning in Your Identity Provider](#configure-scim-group-provisioning-in-your-identity-provider) above.
This documentation is built and hosted on [Mintlify](https://mintlify.com), a developer documentation platform.