> ## Documentation Index
> Fetch the complete documentation index at: https://docs.cloud.cdata.com/llms.txt
> Use this file to discover all available pages before exploring further.
# Keys
> Store data source authentication information in key vaults.
Connect AI supports storing data source authentication information in key vaults. Instead of entering authentication information directly in the **Add Connection** page for your data source, you enter the name of the key vault. You can then update the information in the key vault without affecting your data connection.
* Currently supports Azure Key Vault. Support for additional key vault providers is planned.
* Available for Business tier in Connect AI only.
* Not available for Connect AI Embed.
## Azure Key Vault Prerequisites
Before configuring Connect AI, complete the following steps in the Azure Portal.
### Create an Azure Key Vault
In the [Azure Portal](https://portal.azure.com), search for **Key vaults** and click **Create**.
Select your **Subscription**, **Resource group**, **Key vault name**, and **Region**.
Click **Review + create**.
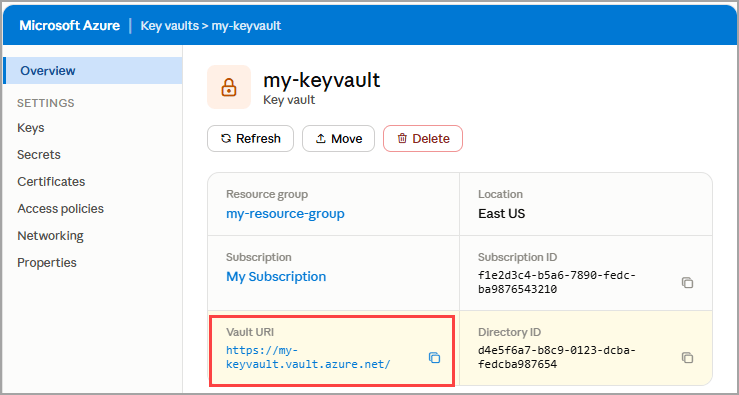
After the vault is created, open it and note the **Vault URI** from the **Overview** page. It follows the pattern `https://.vault.azure.net/`.
 ### Register an Application in Microsoft Entra ID
Connect AI authenticates to your key vault using a registered application (service principal).
In the Azure Portal, navigate to **Microsoft Entra ID** > **Manage** > **App registrations** > **New registration**.
Enter a **Name** for the application and click **Register**.
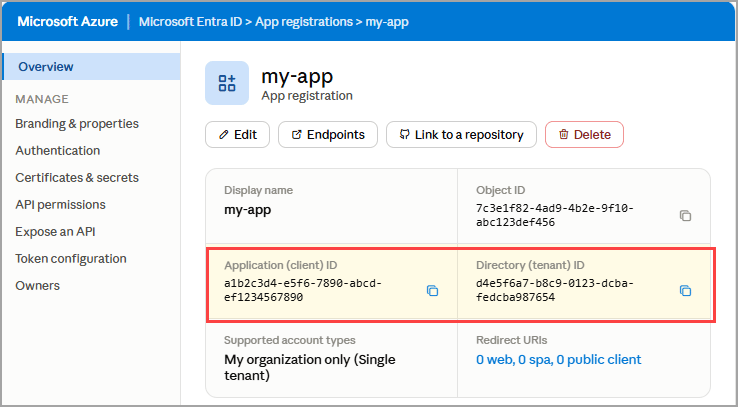
On the app's **Overview** page, note the **Application (client) ID** and the **Directory (tenant) ID**.
### Register an Application in Microsoft Entra ID
Connect AI authenticates to your key vault using a registered application (service principal).
In the Azure Portal, navigate to **Microsoft Entra ID** > **Manage** > **App registrations** > **New registration**.
Enter a **Name** for the application and click **Register**.
On the app's **Overview** page, note the **Application (client) ID** and the **Directory (tenant) ID**.
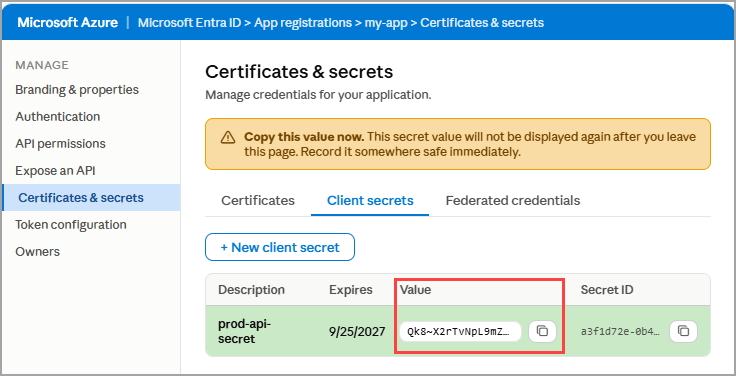
 Go to **Manage** > **Certificates & secrets** > **New client secret**. Enter a description, select an expiration, and click **Add**.
Copy the secret **Value** immediately. It is not shown again after you leave the page.
Go to **Manage** > **Certificates & secrets** > **New client secret**. Enter a description, select an expiration, and click **Add**.
Copy the secret **Value** immediately. It is not shown again after you leave the page.
 ### Grant the Application Access to the Key Vault
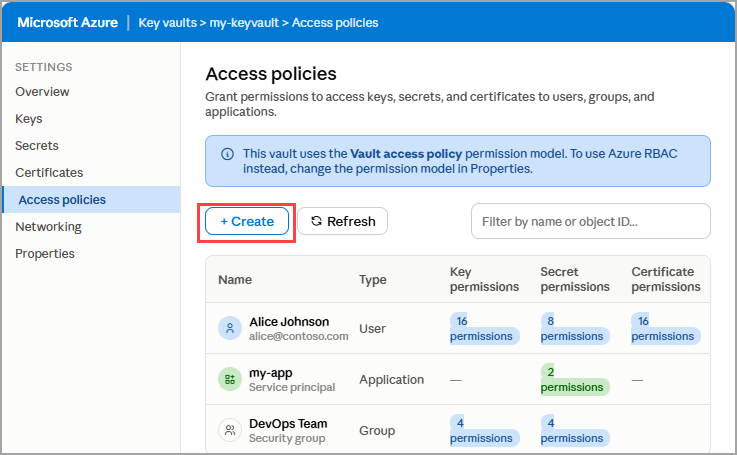
Open your key vault in the Azure Portal and go to **Access policies** > **Create**.
### Grant the Application Access to the Key Vault
Open your key vault in the Azure Portal and go to **Access policies** > **Create**.
 Under **Secret permissions**, select **Get** and **List**.
Under **Principal**, search for and select the application you registered, then click **Next**.
Click **Next** through the **Application** tab (no changes required).
Review the policy and click **Create**. This allows Connect AI to read secrets from the vault.
Back on the **Access policies** page, verify that your access policy is listed.
## Create a New Key Vault
Click **+ Add Vault**. The **Add Azure Key Vault** dialog appears.
Under **Secret permissions**, select **Get** and **List**.
Under **Principal**, search for and select the application you registered, then click **Next**.
Click **Next** through the **Application** tab (no changes required).
Review the policy and click **Create**. This allows Connect AI to read secrets from the vault.
Back on the **Access policies** page, verify that your access policy is listed.
## Create a New Key Vault
Click **+ Add Vault**. The **Add Azure Key Vault** dialog appears.
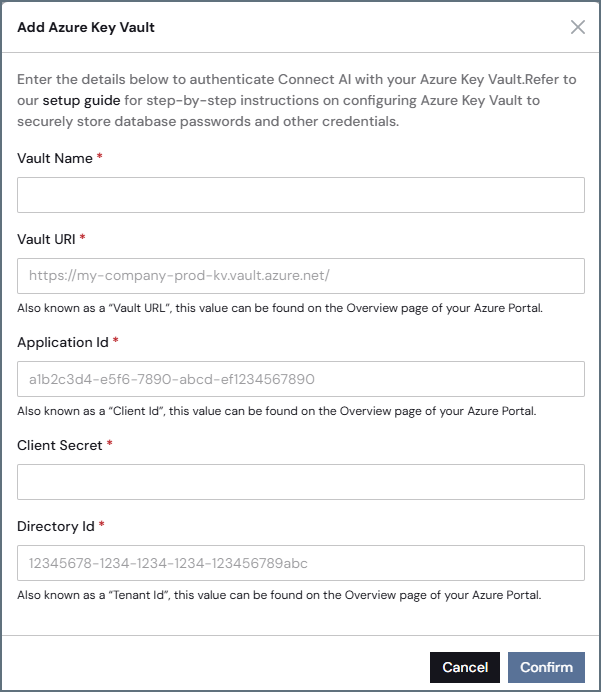 Enter a **Vault Name** to identify this vault in Connect AI. This does not have to match the Azure vault name.
Enter the **Vault URI**. This is the URI from the **Overview** page of your key vault in the Azure Portal (for example, *[https://my-vault.vault.azure.net/](https://my-vault.vault.azure.net/)*). This is in the Create an Azure Key Vault step of the prerequisites.
Enter the **Application Id**, also known as the **Client Id**. This is the **Application (client) ID** from the **Overview** page of your app registration in Microsoft Entra ID (In the Register an Application in Microsoft Entra ID step in the prerequisites).
Paste the **Client Secret** value you copied when you registered the application in Microsoft Entra ID (in the Register an Application in Microsoft Entra ID step in the prerequisites).
Enter the **Directory Id**, also known as the **Tenant Id**. This is the **Directory (tenant) ID** from the **Overview** page of your app registration in Microsoft Entra ID (in the Register an Application in Microsoft Entra ID step in the prerequisites)
Click **Confirm** to save your credentials. If successfully saved, the new key vault appears in the list of key vaults, along with the **Key Vault URL** and **Creation Date**.
Once you create a new key vault, you can use the key vault as a credential for data source connections.
## Delete a Key Vault
To delete a key vault that you no longer use, click the delete icon in the key vault list.
This documentation is built and hosted on [Mintlify](https://mintlify.com), a developer documentation platform.
Enter a **Vault Name** to identify this vault in Connect AI. This does not have to match the Azure vault name.
Enter the **Vault URI**. This is the URI from the **Overview** page of your key vault in the Azure Portal (for example, *[https://my-vault.vault.azure.net/](https://my-vault.vault.azure.net/)*). This is in the Create an Azure Key Vault step of the prerequisites.
Enter the **Application Id**, also known as the **Client Id**. This is the **Application (client) ID** from the **Overview** page of your app registration in Microsoft Entra ID (In the Register an Application in Microsoft Entra ID step in the prerequisites).
Paste the **Client Secret** value you copied when you registered the application in Microsoft Entra ID (in the Register an Application in Microsoft Entra ID step in the prerequisites).
Enter the **Directory Id**, also known as the **Tenant Id**. This is the **Directory (tenant) ID** from the **Overview** page of your app registration in Microsoft Entra ID (in the Register an Application in Microsoft Entra ID step in the prerequisites)
Click **Confirm** to save your credentials. If successfully saved, the new key vault appears in the list of key vaults, along with the **Key Vault URL** and **Creation Date**.
Once you create a new key vault, you can use the key vault as a credential for data source connections.
## Delete a Key Vault
To delete a key vault that you no longer use, click the delete icon in the key vault list.
This documentation is built and hosted on [Mintlify](https://mintlify.com), a developer documentation platform.