If your organization does not use embedded CData credentials, you must first add the CData Sender ID in Sage Intacct:
1
Log in to Sage Intacct as an administrator.
2
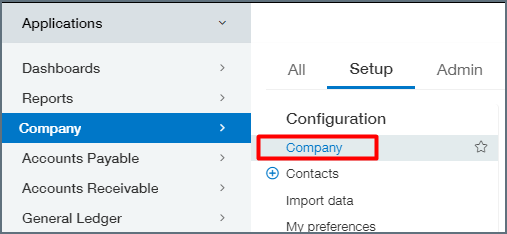
Navigate to Company.
3
Under Setup select Company.
4
Go to the Security section and add the CData Sender ID.
5
If this does not work, utilize our Sender ID and Sender Password to select
another user with the right permissions from your Web Services
authorizations list.
If necessary, contact support@cdata.com for additional assistance.
1
Enter the following information:
User—the Sage Intacct username for authentication.
Password—the user password.
Company ID—the Company ID. You can find this in Sage Intacct under Company > Company info.
2
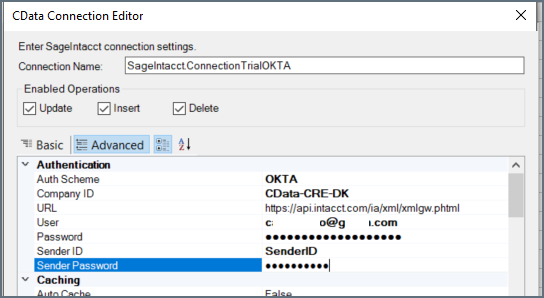
If your organization does not use embedded CData credentials, go to the Advanced Settings tab and enter the following:
Sender ID—the Web Services Sender ID you added above.
Sender Password—the Web Services password you added above.
3
At the top of the Connect AI Add Sage Intacct Connection page, click Save & Test.
If the connection test succeeds, a Connection successfully saved message appears, indicating that your connection has been created. The Status on the Edit Connection page also changes to Authenticated. View the data model of your successful connection in the right pane of the Edit Connection page, in the Data Model tab.
If the connection test fails, ensure that you entered your login information correctly with no stray spaces or other characters. Connect AI displays error messages under the required fields with missing data. Some data sources require that you sign in directly to the source website. If you did not, an error message appears under the Sign in button. Correct the errors and try again.
Unsuccessful connections are saved as drafts and have a Status of Not Authenticated. You can return to the connection and authenticate it later.
1
Enter the following information:
User—the Okta user account.
Password—the password associated with the Okta account.
SSO Login URL—set to the URL used by the SSO provider.
SSO Properties—add property IntacctUserID, set to the Okta user specified in the User connection property. Then add all desired properties. The following is an example of a valid connection string:
If you add an APIToken property, it must be set to the API Token that the customer created from the Okta org. It should only be used when authenticating a user via a trusted application or proxy that overrides Okta client request context.
Company ID—the Company ID. You can find this in Sage Intacct under Company > Company info.
2
At the top of the Connect AI Add Sage Intacct Connection page, click Save & Test.
If the connection test succeeds, a Connection successfully saved message appears, indicating that your connection has been created. The Status on the Edit Connection page also changes to Authenticated. View the data model of your successful connection in the right pane of the Edit Connection page, in the Data Model tab.
If the connection test fails, ensure that you entered your login information correctly with no stray spaces or other characters. Connect AI displays error messages under the required fields with missing data. Some data sources require that you sign in directly to the source website. If you did not, an error message appears under the Sign in button. Correct the errors and try again.
Unsuccessful connections are saved as drafts and have a Status of Not Authenticated. You can return to the connection and authenticate it later.
The OAuth Client Id and OAuth Client Secret come from an app registered in the Azure portal. See Microsoft’s documentation for details.
1
Enter the following information:
User—the AzureAD user account.
Password—the password associated with the AzureAD account.
SSO Login URL—set to the URL used by the SSO provider.
SSO Properties—add property IntacctUserID, set to the AzureAD user specified in the User connection property. Then add all desired properties.
OAuth Client Id—the Client Id from your Azure app registration.
OAuth Client Secret—the Client Secret from your Azure app registration.
Company ID—the Company ID. You can find this in Sage Intacct under Company > Company info.
2
At the top of the Connect AI Add Sage Intacct Connection page, click Save & Test.
If the connection test succeeds, a Connection successfully saved message appears, indicating that your connection has been created. The Status on the Edit Connection page also changes to Authenticated. View the data model of your successful connection in the right pane of the Edit Connection page, in the Data Model tab.
If the connection test fails, ensure that you entered your login information correctly with no stray spaces or other characters. Connect AI displays error messages under the required fields with missing data. Some data sources require that you sign in directly to the source website. If you did not, an error message appears under the Sign in button. Correct the errors and try again.
Unsuccessful connections are saved as drafts and have a Status of Not Authenticated. You can return to the connection and authenticate it later.
The OAuth Client Id and OAuth Client Secret come from an app registered in the OneLogin admin console. See OneLogin’s documentation for details.
1
Enter the following information:
User—the OneLogin user account.
Password—the password associated with the OneLogin account.
SSO Login URL—set to the URL used by the SSO provider.
SSO Properties—add property IntacctUserID, set to the OneLogin user specified in the User connection property. Then add all desired properties.
OAuth Client Id—the Client Id from your OneLogin app registration.
OAuth Client Secret—the Client Secret from your OneLogin app registration.
Company ID—the Company ID. You can find this in Sage Intacct under Company > Company info.
2
At the top of the Connect AI Add Sage Intacct Connection page, click Save & Test.
If the connection test succeeds, a Connection successfully saved message appears, indicating that your connection has been created. The Status on the Edit Connection page also changes to Authenticated. View the data model of your successful connection in the right pane of the Edit Connection page, in the Data Model tab.
If the connection test fails, ensure that you entered your login information correctly with no stray spaces or other characters. Connect AI displays error messages under the required fields with missing data. Some data sources require that you sign in directly to the source website. If you did not, an error message appears under the Sign in button. Correct the errors and try again.
Unsuccessful connections are saved as drafts and have a Status of Not Authenticated. You can return to the connection and authenticate it later.
Copy the Callback URL and confirm it matches the redirect URL registered in your Sage Intacct OAuth application.
2
Enter the OAuth Client Id from your Sage Intacct OAuth application.
3
Enter the OAuth Client Secret from your Sage Intacct OAuth application.
4
Click Sign in to connect securely through OAuth. This action opens the Sage Intacct sign-in page in a new tab.
5
Log in to your Sage Intacct account and provide the requested permissions (if applicable).
6
At the top of the Connect AI Add Sage Intacct Connection page, click Save & Test.
If the connection test succeeds, a Connection successfully saved message appears, indicating that your connection has been created. The Status on the Edit Connection page also changes to Authenticated. View the data model of your successful connection in the right pane of the Edit Connection page, in the Data Model tab.
If the connection test fails, ensure that you entered your login information correctly with no stray spaces or other characters. Connect AI displays error messages under the required fields with missing data. Some data sources require that you sign in directly to the source website. If you did not, an error message appears under the Sign in button. Correct the errors and try again.
Unsuccessful connections are saved as drafts and have a Status of Not Authenticated. You can return to the connection and authenticate it later.